
Synonyms (PrestaShop)
Use this page when shoppers search with words that differ from the words in your catalog. A synonym row lets you connect those terms without editing product names or descriptions.
For the shared concept model, see Synonyms. This page explains the exact PrestaShop dashboard workflow.
Where to find it
Section titled “Where to find it”In the PrestaShop back office:
- Open Modules -> Module Manager.
- Find Kea Labs Search Pro in the module list.
- Click Configure on the module row.
- The embedded Kea Labs dashboard opens inside the Configure page.
- In the dashboard navigation, open Settings → Synonyms.
If the Configure button is not visible, your role does not have the
Modules permission. See
Install (PrestaShop): If the Configure button is missing.
What the page shows
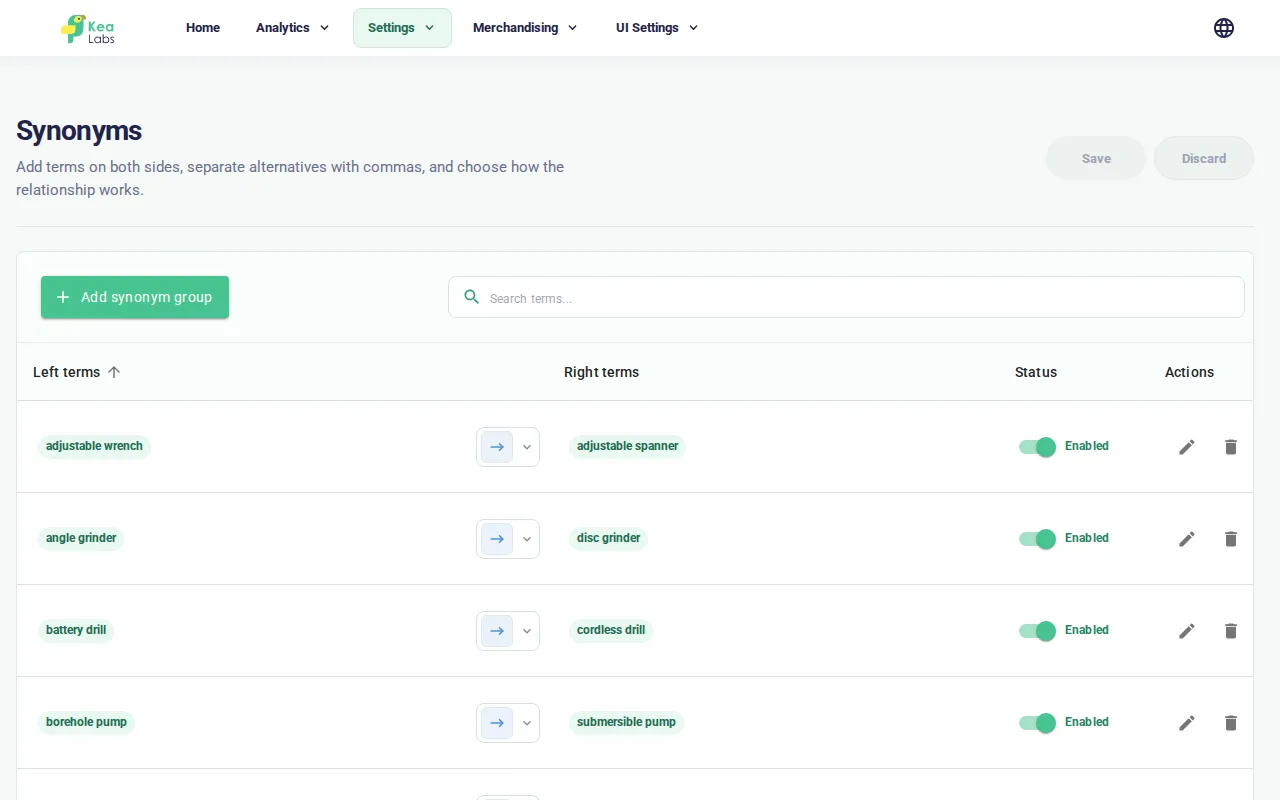
Section titled “What the page shows”The Synonyms page is a table. Each row is one synonym rule.
| Field | What it means |
|---|---|
| Left | Source term or source terms. Use commas for multiple terms. |
| Right | Target term or target terms. Use commas for multiple terms. |
| Relation | The arrow between the term groups. Choose Unidirectional (left → right) or Bidirectional (left ⇄ right) from its menu. |
| Status | Enabled rows are applied by search. Disabled rows stay saved but are ignored. |
| Actions | Delete the row. |
Saved terms appear as compact chips. Click a row or its pencil action to edit the comma-separated values. The table also has a search field for finding rows and an Add synonym group button for creating a new row.
Direction
Section titled “Direction”Use Unidirectional when the left term should expand to the right term, but not the other way around.
Example: sneaker -> shoe. A shopper searching for sneaker can see
products that use shoe. A shopper searching for shoe does not get
forced into the narrower sneaker category.
Use Bidirectional when both terms are interchangeable.
Example: hoodie <-> sweatshirt. A shopper searching either term can see
products that use the other term.
A new row starts as Bidirectional. Change the relation before saving if the terms are broader/narrower rather than interchangeable.
Status
Section titled “Status”An enabled row is used by search. A disabled row stays in the table but is ignored by search.
Disable a row when you want to pause it without losing the terms. Delete a row when you no longer expect to use it.
Add a synonym row
Section titled “Add a synonym row”- Click Add synonym group.
- Enter the source term in Left. Use commas only when every term in the cell should behave the same way.
- Enter the target term in Right.
- Set the relation to Unidirectional or Bidirectional.
- Leave Status enabled unless you want to save the row without using it yet.
- Press Enter to accept the row, then click Save.
After the save succeeds, new search requests can use the updated synonym rules immediately.
Edit a synonym row
Section titled “Edit a synonym row”- Click the Left or Right cell and edit the terms.
- Change the relation if the expansion should become unidirectional or bidirectional.
- Change Status if the row should be enabled or disabled.
- Press Enter to accept the row, then click Save.
Press Escape while editing to close the editor without accepting that inline edit. Save and Discard become available when the page has pending changes.
Delete a synonym row
Section titled “Delete a synonym row”- Click the trash icon on the row.
- Confirm the intended table state.
- Click Save.
Deleting is permanent. If you delete a row by mistake, add it again with the same terms and direction.
What happens when you click Save
Section titled “What happens when you click Save”The dashboard saves the full intended synonym table, then reloads the saved state. If the save succeeds, Save becomes inactive because nothing is pending.
A synonym save does not start catalog indexing and does not require a preview bundle build. The next search request uses the current saved rules.
If the save fails, reload the page before retrying so you are editing the latest saved table.
How to verify the change
Section titled “How to verify the change”After Save succeeds:
- Run a new search request where you need to validate the rule: storefront preview before launch, or the live storefront if live search is already on.
- Run the shopper query that motivated the synonym.
- Confirm the expected products appear.
- For a Unidirectional row, also test the opposite direction. The right term should not unexpectedly expand back to the left term.
- Test one unrelated query to confirm the synonym did not broaden search too much.
If the same browser tab shows an old response, refresh the storefront page and run the query again.
Troubleshooting
Section titled “Troubleshooting”“I saved a synonym but the result did not change”
Section titled ““I saved a synonym but the result did not change””A catalog reindex is not required for synonyms. Check the rule first:
- Is the row enabled?
- Is the direction correct?
- Are the source and target terms spelled the way shoppers and the catalog spell them?
- Does the target term actually appear in products that should be found?
- Did you refresh the storefront page and run a new search request?
If those are correct and products still do not appear, the issue may be field priority, product data, or catalog indexing rather than synonyms.
“The expansion went the wrong way”
Section titled ““The expansion went the wrong way””Open the row, change its relation, save, and re-test. You do not need to run catalog indexing after changing direction.
“The synonym is too broad”
Section titled ““The synonym is too broad””Split the row into narrower rows or delete it. A synonym should connect a specific shopper term to a specific catalog term. Avoid long rows that mix related but different product categories.
“I cannot find the Synonyms page”
Section titled ““I cannot find the Synonyms page””Open Modules -> Module Manager -> Kea Labs Search Pro -> Configure, then Settings → Synonyms. If the Configure button is missing, see Install (PrestaShop): If the Configure button is missing.
Related pages
Section titled “Related pages”- Synonyms - shared concept reference.
- Search fields and priorities - when the right products are returned in the wrong order.
- Facets - storefront filter sidebar configuration.
- Search Analytics - find zero-result queries and vocabulary gaps worth fixing with synonyms.