
Search fields and priorities (PrestaShop)
Use this page when you need to change the priority of a search field in the PrestaShop Kea Labs dashboard, or understand why the autocomplete column may or may not be available for your shop.
For what a field is, the four priority levels, and how field priority changes result order, see Fields and priorities. This page covers the PrestaShop controls, priority levels, and save workflow.
Where to find it
Section titled “Where to find it”In the PrestaShop back office:
- Open Modules → Module Manager.
- Find Kea Labs Search Pro in the module list.
- Click Configure on the module row.
- The embedded Kea Labs dashboard opens inside the Configure page.
- In the dashboard navigation, open Settings → Fields.
If the Configure button is not visible, your role does not
have the Modules permission. See
Install (PrestaShop): If the Configure button is missing.
What the page shows
Section titled “What the page shows”The Fields page is a list of search field rows. Each row is one column of the product record that the search engine considers when a shopper types a query. Typical entries include Product Name, Product Parameters, Product Tags, Vendor, Model, and Product Description. The page uses readable labels instead of internal field keys.
The page has two sections, from top to bottom:
- A list of field rows. Each row has three columns:
- Field name — the label of the field, with a short description of what the field is for.
- Priority — a four-part control labelled Ignored, Low, Normal, and Boosted.
- Autocomplete — a switch that turns the field on or off in the storefront search bar. This column is hidden on store setups that do not support per-field autocomplete.
- A Save and Discard button group at the top right of the page. The buttons only become active when at least one field has been modified.
The list of fields is fixed by the search engine schema. You cannot add or remove fields from this page. What you can change is the priority control and the autocomplete switch for each field.
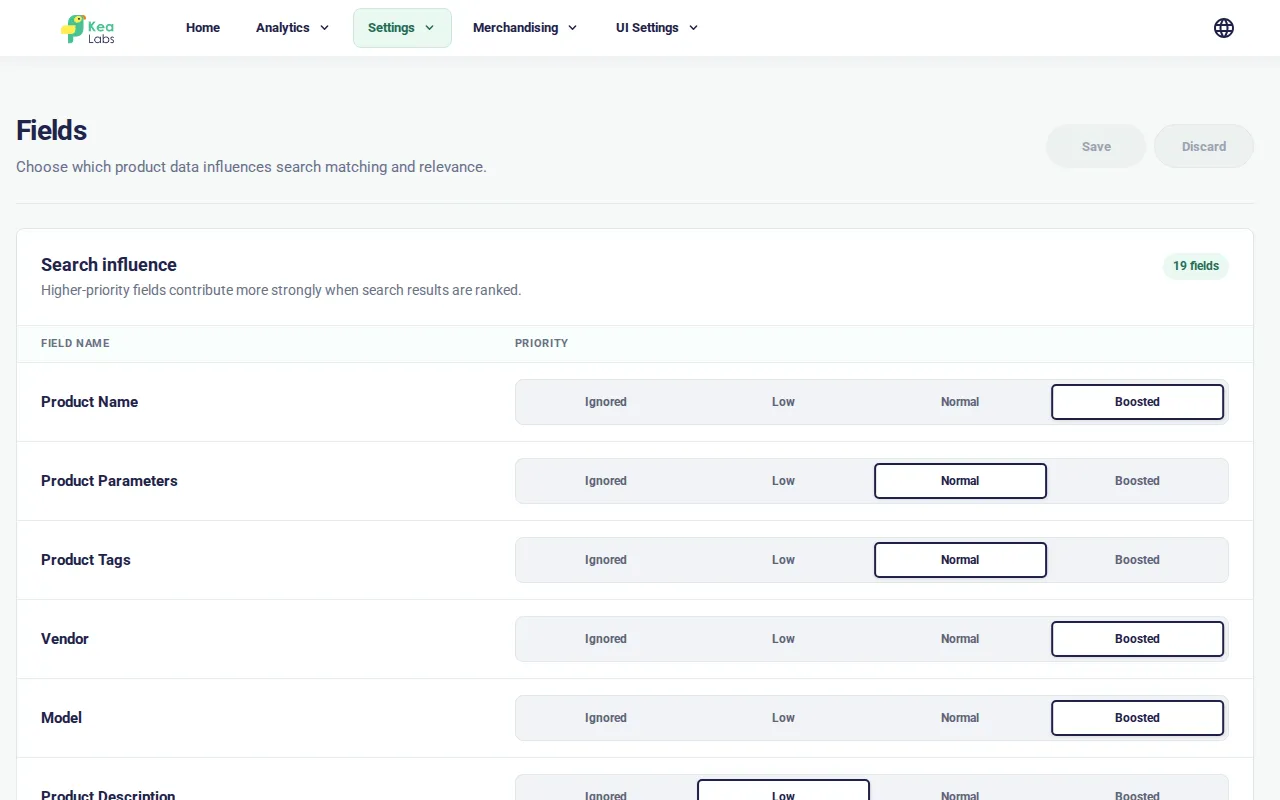
The priority control
Section titled “The priority control”The Priority column shows four connected choices. From left (lowest contribution to the match score) to right (highest):
- Ignored — the field has the lowest ranking contribution. Do not rely on matches in this field to promote products.
- Low — the field contributes at a restrained weight.
- Normal — the field is a regular ranking signal and contributes more than Low.
- Boosted — the field contributes the most. Matches in this field dominate the ranking.
Click a level to select it. You can also drag across the control to move between levels. The selection always settles on one of the four choices; there are no in-between values.
The numeric weight of each level is an implementation detail of the ranking formula and is not surfaced in the UI. The four levels are the only way to adjust a field’s contribution.
The autocomplete switch
Section titled “The autocomplete switch”The Autocomplete column shows a switch. When the switch is on, the field contributes to the list of suggestions that the storefront search bar shows as the shopper types. When off, the field is still searched, but its matches do not appear as suggestions.
The autocomplete column may not appear in the UI for every shop. Some store setups do not support per-field autocomplete. In that case, the dashboard hides the column.
[!TIP] If you expected to see the Autocomplete column and it is missing, ask your developer or integrator to confirm whether your store setup supports per-field autocomplete.
Change the priority of a field
Section titled “Change the priority of a field”- On the Fields page, find the row for the field you want to change.
- Click the required level in the Priority column, or drag across the control. The change is held in the page state.
- Repeat for any other fields you want to change in the same save.
- Click Save at the top right of the page.
A typical priority scheme is:
- Product Name — Boosted (the dominant ranking signal).
- Product Description — Normal or Low, depending on catalog quality.
- Product Parameters, Product Tags, and Vendor — Normal when they are useful shopper-facing signals.
- Kea-managed ranking fields — Normal or Ignored (depending on the integrator’s recommendation).
[!NOTE] The selection is stored per row. After editing, scroll to the bottom of the list and confirm the rows you touched are at the level you expected. Setting the most important field to Ignored by accident is the most common priority mistake.
Toggle the autocomplete switch
Section titled “Toggle the autocomplete switch”- On the Fields page, find the row for the field you want to change.
- Click the switch in the Autocomplete column. The change is held in the page state.
- Repeat for any other fields you want to change in the same save.
- Click Save at the top right of the page.
A common autocomplete pattern is to enable only the fields
that uniquely identify a product (name, reference,
category, brand), and leave the rest off. Suggestions
pulled from a generic field like description are usually too
noisy to be useful.
What happens when you click Save
Section titled “What happens when you click Save”The dashboard saves all field edits on the page together. If the Autocomplete column is hidden, the save contains priority changes only. The save:
- Reads the current field rows from storage.
- Computes the difference: which rows have a new priority, which have a new autocomplete value.
- Applies the difference.
A successful save reloads the page from storage. The Save button becomes inactive because nothing is pending.
A failed save shows the error in the page. Before retrying, reload the page so the list is compared against the current stored state.
How a change reaches the storefront
Section titled “How a change reaches the storefront”Field settings affect ranking and autocomplete data, so the catalog index has to be refreshed before shoppers see the new behavior.
In the PrestaShop dashboard this is automatic: after a successful Save, the dashboard starts or queues catalog indexing. You do not need to run a separate full reindex for the normal Fields workflow.
While indexing is running, the dashboard can show an indexing status indicator and temporarily block affected configuration pages. Wait for indexing to finish, then test the changed query in storefront preview.
If the save succeeds but indexing cannot start, the dashboard shows an error notification. Use Catalog Indexing (PrestaShop) to check status and retry indexing.
Common mistakes
Section titled “Common mistakes”- Setting every field to Boosted. When every field has the same priority, the control no longer distinguishes matches. A common pattern is Boosted for Product Name, Normal for the next two or three most relevant fields, and Low for everything else.
- Setting the most important field to Ignored by accident. The selection is stored per row. After editing, scroll to the bottom of the list and confirm the rows you touched are at the position you expected.
- Looking for the Autocomplete column on every shop. The column is hidden when the current store setup does not support per-field autocomplete. The absence of the column is not a bug.
- Saving one field at a time. The save is the full final state. Set every field you want to change in a single edit pass, then save once.
Related pages
Section titled “Related pages”- Fields and priorities — how field priority changes ranking.
- Facets (PrestaShop) — the Facets page workflow.
- Synonyms (PrestaShop) — the Synonyms tab workflow.