
Facets (PrestaShop)
Use this page when you need to edit, reorder, show, or hide a facet in the PrestaShop Kea Labs dashboard.
For what a facet is, how placement zones work, which facet types are available, and how facets become the storefront filter sidebar, see Facets and filters. This page covers the PrestaShop controls and how to verify a change on the storefront.
Where to find it
Section titled “Where to find it”In the PrestaShop back office:
- Open Modules → Module Manager.
- Find Kea Labs Search Pro in the module list.
- Click Configure on the module row.
- The embedded Kea Labs dashboard opens inside the Configure page.
- In the dashboard navigation, open Settings → Facets.
If the Configure button is not visible, your role does not
have the Modules permission. See
Install (PrestaShop): If the Configure button is missing.
What the page shows
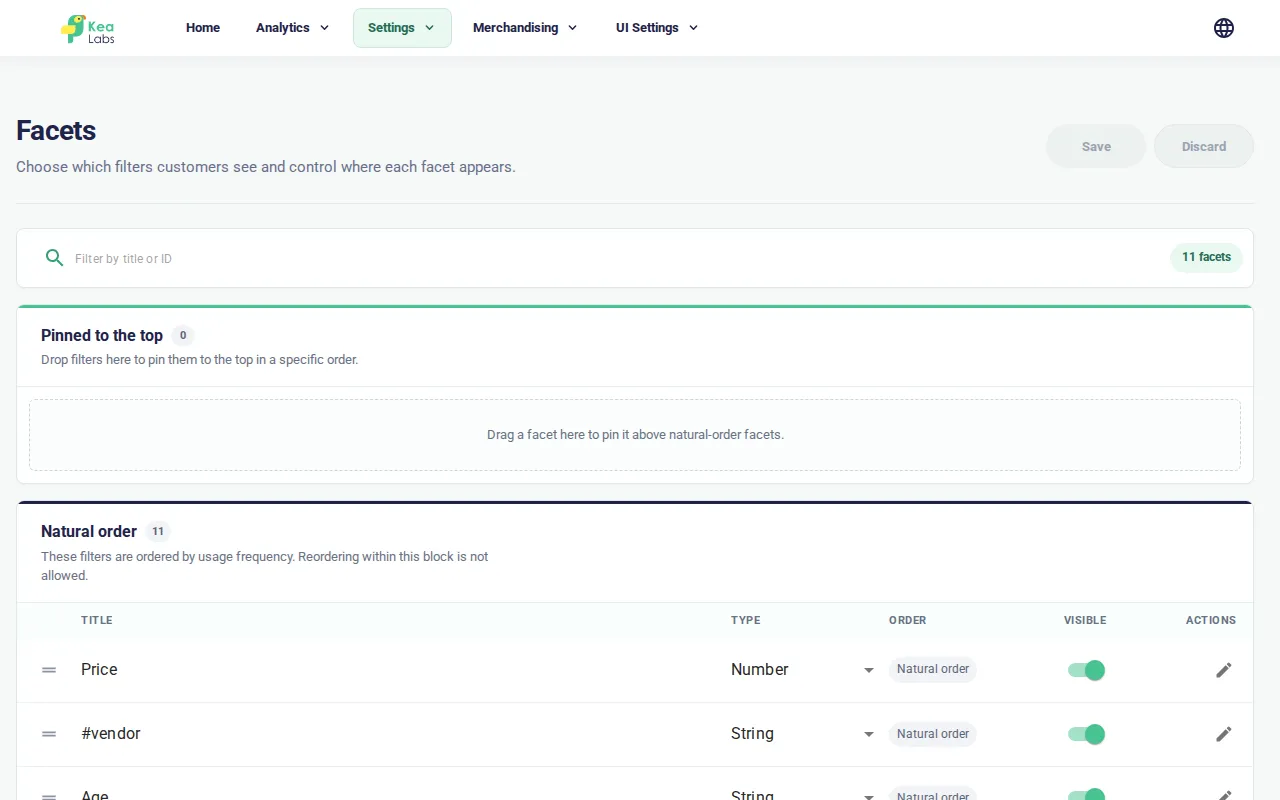
Section titled “What the page shows”The Facets page is a list of facets. Each entry is one filter that the storefront can show in its filter sidebar.
The page has three sections, from top to bottom:
- A search field at the top of the page. The search field filters the list by facet title or ID — useful when the facet list is long.
- Three horizontal placement zones containing the facet rows. The zones are labelled from top to bottom: Pinned to the top, Natural order, and Pinned to the bottom. Drag a row between zones to change how it is ordered on the storefront.
- A Save and Discard button group at the top right of the page. The buttons only become active when at least one facet has been modified.
A facet row shows the facet title, type, order, visibility, and actions. You can edit the title or type inline, toggle whether the facet is visible, drag the row, or click the pencil icon to open the edit modal.
The edit modal
Section titled “The edit modal”Click the pencil icon on a facet row to open the edit modal. The modal has these fields:
| Field | What it means |
|---|---|
| Title | The label shown on the storefront filter sidebar. The title is also the label shown in the admin list. |
| Type | The kind of value the facet holds. Four values: String, Number, Boolean, Color. Changing the type changes how the storefront renders the filter, so verify it in preview after saving. |
| Position | Where the facet sits in the storefront sidebar. The behaviour depends on Manual positioning (see below). When Manual positioning is off, the helper text shows Natural (sorted by frequency). When on, this field is a signed integer: 0 = first from the top, -1 = first from the bottom, -2 = second from the bottom, etc. |
| Manual positioning (top/bottom by sign) | When off, the facet is in the natural zone and is sorted by frequency on the storefront. When on, the facet is anchored to a fixed position from the top (positive) or the bottom (negative) of the sidebar. |
A typical Boolean facet — say in_stock — is created as
Type: Boolean with Manual positioning on and
Position: -1, so it shows as the last filter on the
storefront sidebar.
A typical Color facet — say color — is configured as
Type: Color with Manual positioning on and
Position: -2, so it shows just above the Boolean facet.
A typical String facet for a narrow attribute — say brand —
is created as Type: String with Manual positioning on
and Position: 1 (just below the first pinned facet, which
is usually category).
A typical String facet that you want sorted by frequency — say
tags — is created as Type: String with Manual
positioning off, so the storefront reorders this facet on
every render.
The value editor
Section titled “The value editor”The Value editor opens from a facet row when the row exposes the palette action. It is used to configure value mappings for Boolean and Color facets.
- String and Number — values are read from the catalog and are not edited from the Facets page.
- Boolean — the editor maps each catalog value (true / false) to a display label. A Boolean facet has exactly two values.
- Color — the editor maps each catalog color to a display label and a swatch color.
If a facet does not show the value-editor action, its values are controlled by the catalog data and the index, not by this page.
Show or hide a facet
Section titled “Show or hide a facet”- On the Facets page, find the facet row.
- Use the Visible switch.
- Click Save at the top right of the page.
Hiding a facet is the safe alternative to deleting it. The facet stays in the admin list, but shoppers no longer see it on the storefront filter sidebar.
Edit a facet
Section titled “Edit a facet”- On the Facets page, click the pencil icon on the facet row. The edit modal opens.
- Edit Title if needed.
- Edit Type only if the storefront should render this facet differently.
- Edit Manual positioning and Position if needed.
- Click Save in the modal.
- Click Save at the top right of the page.
A facet row is marked as modified as soon as you change any of its fields. The Save button only becomes active when at least one facet is modified, so you cannot miss a pending save.
Reorder a facet
Section titled “Reorder a facet”You can reorder a facet in two ways: by dragging the row to a new zone, or by editing the Position in the edit modal.
Reorder by drag
Section titled “Reorder by drag”- On the Facets page, click and hold the drag handle on the facet row.
- Drag the row to a new zone, or to a new position inside the same zone.
- Drop the card. The list updates immediately.
- Click Save at the top right of the page.
Drag a row from the natural zone to the top or bottom zone to anchor it to a fixed position. Drag a row from the top or bottom zone to the natural zone to make it frequency-sorted.
[!NOTE] Within the natural zone, the order shown in the admin is not the order shown on the storefront. The natural zone is frequency-sorted on every render.
Reorder by edit
Section titled “Reorder by edit”- On the Facets page, click the pencil icon on the facet row.
- In the edit modal, change Manual positioning to on if the facet is currently in the natural zone.
- Change the Position integer.
- Click Save in the modal.
- Click Save at the top right of the page.
Add or remove facets
Section titled “Add or remove facets”The current PrestaShop dashboard does not expose add or delete controls on the Facets page. The page configures facets that are already available for the shop.
If a filter is missing from the list, first confirm that the underlying catalog attribute exists for the current shop and language. Then run catalog indexing from the dashboard and reload the Facets page. If the facet still does not appear, contact your integrator instead of trying to create it from this page.
What happens when you click Save
Section titled “What happens when you click Save”The dashboard saves all facet edits on the page together for the current zone configuration. The save:
- Reads the current facets from storage.
- Computes the difference: which facets are new, which are modified, which are removed.
- Applies the difference.
A successful save reloads the page from storage. The Save button becomes inactive because nothing is pending.
A failed save shows an error notification. Before retrying, reload the page so the list is compared against the current stored state.
How a change reaches the storefront
Section titled “How a change reaches the storefront”Some filter changes affect indexed search data. In the PrestaShop dashboard, those changes start or queue catalog indexing automatically after Save succeeds.
Catalog indexing is triggered when:
- the indexed facet set changes;
- a facet type is changed;
- a Boolean or Color value mapping is changed.
Catalog indexing is not required when:
- a facet is moved between zones;
- the manual position of an existing facet is changed;
- the title of an existing facet is changed.
[!NOTE] A facet title change renames the storefront filter. The underlying facet identity and its value list are preserved.
While indexing is running, the dashboard can show an indexing status indicator and temporarily block affected configuration pages. Wait for indexing to finish before verifying filters in storefront preview.
Common mistakes
Section titled “Common mistakes”- Changing a facet type without checking the storefront. A type change can alter how values render. Save, wait for catalog indexing to finish, then verify in preview.
- Sorting pinned facets alphabetically in the natural zone. The natural zone ignores your ordering. To get a specific order, move the facet out of the natural zone and use manual positioning.
- Anchoring every facet to a fixed position. The natural zone exists for a reason — it lets the storefront highlight the most useful filters for the current query. Pinning everything to the top removes that signal.
- Looking for add/delete controls on this page. The current PrestaShop Facets page configures existing facets. Use the Visible switch to hide a facet from shoppers.
Related pages
Section titled “Related pages”- Facets and filters — how facets and placement zones work.
- Search fields and priorities (PrestaShop) — the Fields tab workflow.
- Synonyms (PrestaShop) — the Synonyms tab workflow.